Wednesday, May 28, 2008

Fit to be Dyed Part II

So here they are, dyed and everything. Unfortunately I didn't take any dye process pictures, but you didn't miss much, just some navy blue RIT dye.

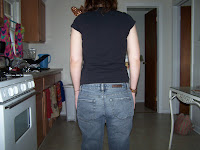
Here a quick picture of the back. About 20 minutes into dying the jeans I looked over at my sewing station and saw the back pockets chilling with my pin cushion, I quickly tossed them in hoping that they would be able to soak up some color. They did, but not as much as the actual pants did.


Despite the mismatched/wonky back pockets I'm pretty happy with the jeans. I'm hoping that once they go through the wash some of the residual dye will come out and the pockets won't look so bad (to me).


Its nice to know that I can overcome whatever issues the fashion industry has with my body by taking matters into my own hands.


Friday, May 23, 2008

Fit to be Dyed

For a while now I've been wanting to try out the whole skinny pant leg trend thats been so popular. I've tried on pairs in stores and I could never find a pair that looked right, it would be loose at the waist, fit at the thigh, and bunch up like crazy at the knees. I figured why not give it a go myself. I had seen a bunch of tutorials on craftster and similar sites, but they all started out with jeans that fit properly through the waist and thighs. The particular pair of jeans I had in mind were about four sizes too big.

After a trip to the library I came home and began looking over the readers digest complete guide to sewing to see how to go about reconstructing these or if it was even possible. I began by removing the waist band and back pockets, then tried them on. Holding the excess fabric in the back I pinned it into a large dart. Then after carefully removing the pants I measured the pinned fabric, divided the number in half and made two darts going through the middle of each pocket...is that clear?


After getting the waist to fit I tried the pants on inside out and marked where I wanted the pant legs taken in. Then after taking off the pants I basted the new inseam and tried on the jeans to see if they needed any more adjustments. Once I was happy with the new inseam I sewed the new inseam using a straight stitch and then reinforced the new seam with a zig zag stitch.

I was overall happy with the end result, but light denim skinny jeans aren't the most flattering thing on earth, I knew what had to be done, it was time to dye.

Monday, May 12, 2008

Mens shirt to summer shirt

It all started out with a striped mens shirt from H&M, I spotted it the second I walked into the salvation army a few months ago. Originally I thought about turning it into a simple racer back tank top and doing some free hand embroidery. However, after beginning the project I started to not like the horizontal stripes as much as I originally thought I would (Please excuse the mess in the pictures).


After a bit of playing around with it I cut off the torso of the shirt and made an empire waist by adding a band of vertical stripes. I cut the remaining torso fabric in half and added extra fabric from the sleeves to give the bottom part of the shirt more swing. I also added a scalloped/ruffled edge on the bottom of the extra fabric and on the edge of the sleeves.


The finished product:


Sunday, May 4, 2008

Wardrobe refashion pledge

The Pledge

I Rebecca (a.k.a. dustbuunnyodoom), pledge that I shall abstain from the purchase of "new" manufactured items of clothing, for the period of 2 months. I pledge that i shall refashion, renovate, recycle preloved items for myself with my own hands in fabric, yarn or other medium for the term of my contract. I pledge that I will share the love and post a photo of my refashioned, renovoated, recylcled, crafted or created item of clothing on the Wardrobe Refashion blog, so that others may share the joy that thy thriftyness brings!

Signed, Rebecca.

Wardrobe Refashion